First, a disclaimer: unlike lunar eclipses, meteor showers and many other phenomena, where I already have a fair bit of expertise and experience, I’ve never actually witnessed a total solar eclipse, let alone photographed one. However, there are three due to take place in Spain over the next few years, and that calls for some proper preparation. And so that all this work isn’t just for my own benefit, here’s a “little” blog post 😉
Enough preamble – let’s get started!
- What exactly is a solar eclipse?
- When and where are they going to happen?
- Where exactly should you go to watch?
- What can you see/photograph?
- How do you photograph these effects?
- How do you edit the footage?
1. What exactly is a solar eclipse? ⇧

At first glance, the Moon simply stands between the Sun and the Earth. During the day, we stand in the Moon’s shadow – and there you have it: a solar eclipse.
As always, of course, it’s more complicated than that 😉
Simply because there isn’t ‘the’ shadow. The ‘big sun’ shines from its edges, passing sideways past the ‘little moon’. So even with a perfect alignment, there is only a very small area where absolutely no sunlight reaches – in the umbra. In the much larger penumbra, however, part of the sun is always visible.
Types of solar eclipses ⇧
This gives us two types of solar eclipse: total eclipses, where the Sun’s disc is completely obscured, and partial eclipses, where only a portion of it is ‘nibbled away’. Because the Moon and Sun have fixed sizes but their relative distances vary, their apparent diameters differ for observers on Earth (see the sensationalist nonsense about the ‘supermoon’). Consequently, it can also happen that the Moon is not ‘big enough’ to cover the Sun – this can result in an annular solar eclipse as a third type. In only around 1% of cases, there is a fourth variant – so-called hybrid solar eclipses. These are usually annular at the start and end of their path across the Earth, and in a narrow corridor in between, with totality lasting only very briefly.
At any point on Earth where a total solar eclipse can be observed, a partial eclipse is always visible before and after totality – provided the Sun is above the horizon. ‘True’ partial eclipses, on the other hand, are partial at all times and everywhere on Earth, as only the Moon’s penumbra falls on the Earth. However, this can only occur near the poles. For observers, however, the distinction is irrelevant – the experience is identical.
Looking at the diagram, one might wonder why a solar eclipse doesn’t occur every new moon (which is, after all, the configuration where the side of the Moon facing the Earth isn’t illuminated by sunlight).
As mentioned – it’s ‘more complicated’ 😉 This is due to the inclination of the Moon’s orbit relative to the plane of the ecliptic, on which the Sun and Earth lie. A solar eclipse only occurs when the three celestial bodies are (precisely enough) aligned. During most new moons, the umbra simply passes by the Earth.
Contact Times
The relevant stages of a total solar eclipse are rather unimaginatively labelled Contact 1 to C4:
- C1: The Moon ‘kisses’ the Sun; the partial phase begins. Unlike during a lunar eclipse, there is no penumbral phase that is initially imperceptible to the naked eye. You can immediately see (wearing solar eclipse glasses!) the Sun with a bite taken out of it.
- C2: The Moon has just completely covered the Sun – the total phase begins.
- C3: The Moon is about to reveal the first patch of the Sun again. The total phase ends and the second partial phase begins.
- C4: The Moon leaves the Sun’s disc as seen by observers – the partial phase ends
The same applies to annular eclipses – except that, from C2 to C3, it is the ring of sunlight around the Moon that is visible rather than totality.
We could now go on to discuss lunar nodes, various solar cycles, the connection with lunar eclipses and the influence of tidal friction—which slows down the Earth’s rotation—on the accuracy of solar eclipse predictions; however, we shall spare you that here. If you’re interested, have a browse at https://en.wikipedia.org/wiki/Solar_eclipse and related sites.
Some history ⇧
Clearly, in the past, this phenomenon was an overwhelming and certainly even frightening experience for people, as it occurred without any warning. Without any knowledge of the workings of the heavens or how our Sun ‘works’, the idea of the end of the world must not have seemed all that far-fetched to people back then. Some crackpots still spin tales about it today – just as they do about chemtrails, lizard people, the flat Earth, and, of course, the moon landing, which some people still believe was a hoax. And this despite all the education we are privileged to enjoy in the Western world and the wealth of knowledge that is theoretically available – sigh.
Even though the first solar cycles were already known in Babylonia as early as 800 BC, eclipses were mostly attributed in various cultures to angry gods and the like in the afterlife. It was only the natural philosophers of Miletus who sought the causes of such phenomena in the ‘here and now’. A certain Thales of Miletus not only left behind the theorem involving the triangle, but, according to Herodotus’ accounts, also predicted the solar eclipse of 585 BC. When it occurred, a war is even said to have come to an end – if only it were that simple today, and if only we had a few more solar eclipses…
It wasn’t until some 2,000 years later that scientific progress really took off again, once advocates of the heliocentric model of the universe were no longer immediately thrown onto the pyre. In 1829, Friedrich Wilhelm Bessel introduced a calculation method that made it possible to predict the course of a solar eclipse across the globe far more accurately – a task that was by no means easy – and his name is still mentioned regularly today! The potential for solar research through the obscured solar disc was also recognised. A particular ‘highlight’ was undoubtedly the eclipse of 20 May 1919, which confirmed certain aspects of a completely abstruse theory put forward by a third-class technical expert at the Bern Patent Office – Einstein’s theory of relativity.
2. When and where do solar eclipses take place? ⇧
The three main types occur with roughly the same frequency across the globe. Between two and five solar eclipses take place each year – 2.38 on average over the long term. If you’re lucky enough to have a total solar eclipse ‘on your doorstep’, you’re in for a treat. Statistically, this only happens once every 375 years. But as is often the case with statistics and averages: there are also places where eclipses occur in quick succession, whilst others have to wait thousands of years.
A good overview of lunar eclipses is available at https://www.timeanddate.de/finsternis/ – worldwide or by location and year. It includes an eclipse map, a simulated path and exact times. A great source of information specifically for the three upcoming eclipses in Spain between 2026 and 2028 is: https://visualizadores.ign.es/eclipses/
Of relevance to Central Europe are the two total eclipses on 12 August 2026 in Iceland and Spain, and on 2 August 2027 at the Strait of Gibraltar and in parts of North Africa, including some countries that are not entirely without their challenges for astro-tourism. This will be followed by an annular solar eclipse, also visible in Spain, on 25 January 2028.
Total eclipse of the Sun, 12 August 2026 – Iceland & Spain

The eclipse is already visible in Iceland – provided the cloud cover allows it. The same problem arises everywhere, of course, but in Spain some regions should offer better viewing conditions. However, the further south you want to observe it, the lower the sun will be in the sky. This means more atmospheric distortion, haze and the risk that even distant clouds will interfere. On the Atlantic coast, totality will occur when the sun is at an altitude of around 10°. In Majorca, at just around 2.5°, it will be extremely close to the horizon. The positive aspect of the low position, however, is the opportunity to incorporate an attractive foreground very effectively in photographs. The visual impression is also likely to be even more impressive than when the sun is high at the zenith. Totality lasts 1 minute 50 seconds in northern Spain and just over a minute in Majorca. My focus: experiencing the event, letting things run their course, using automation and testing everything possible. You shouldn’t expect superb corona images so close to the horizon, but perhaps ‘something’ nice with a foreground?
BTW: 12 August is the peak of the Perseids – a decent fireball in front of the eclipsed sun? Otherwise, after the eclipse, just catch some shooting stars – you can find all the info here (only german language) 🙂
Total eclipse of the Sun, 2 August 2027 – Southern Spain & North Africa

In Tarifa, Spain, or even in Gibraltar, you’ll definitely be within the totality zone, even if you’re not perfectly on the central path. On the Rock of Gibraltar, with the access road cutting right across the airport runway, it’s already going to be a tight squeeze. Things are also set to get absolutely heaving in the Tarifa area – make sure you secure accommodation as early as possible! For North African countries, be sure to check travel warnings for tourists – and, no joke, photographic/astronomical equipment isn’t welcome everywhere. If you’re planning to take it, do your research thoroughly in advance!
In Tarifa, totality lasts a full 4 minutes and 40 seconds, with the sun standing relatively high in the sky at 38°, and that’s in an area with little cloud cover! Whether those few extra seconds of totality are worth the trip to Egypt – and the extra heat, etc. – is something you’ll have to decide for yourself. In any case, I’ve already booked my trip to Spain.
Annular solar eclipse on 26 January 2028 in Portugal and Spain

The ring of fire around the sun has a charm all of its own. Even if the experience isn’t quite as impressive as a total eclipse – mainly because the change in brightness is nowhere near as dramatic. Photographically, however, it is extremely attractive, as it is very flat. From just under 10° on the west coast of Portugal right down to the horizon in eastern Spain. Capturing the ring of fire over a mountain peak or a church tower with a long telephoto lens sounds, at least to me, extremely tempting 🙂
Further solar eclipses, with a focus on Europe
If you happen to be in Australia on 22 July 2028, there will be a spectacular solar eclipse with totality lasting over 5 minutes in some places. An annular eclipse will occur much closer to 1 June 2030 Greek, on 25 November 2030, it will be South America’s turn, followed by Australia again.
As for Europe, we’ll have to wait until 2039, and even then it will be ‘only’ a ring-shaped one, ending in Scandinavia. In 2048, there will be another annular eclipse in Scandinavia, before we have another annular eclipse in France and Italy in 2059.
If you don’t want to wait until 2081, until France, Switzerland and Austria are in for a treat with a total solar eclipse: off to Spain in the coming years!
3. Where exactly should one go to observe it? ⇧
Stay close to the central path with a clear view of the Sun where there is little chance of cloud cover, and: have a Plan B ready!
For total eclipses, make sure you travel to where totality can be observed! The experience is completely different and cannot be compared in any way to a partial eclipse! It doesn’t have to be perfectly on the central path – the duration of totality doesn’t decrease rapidly as you move away. But 1 km too far out and all the unique effects are gone!
Of course – you need a clear line of sight to the Sun during the eclipse phases. This is particularly important for eclipses close to the horizon, such as those in Spain in 2026 and 2028. If you only realise once you’re there that a mountain range is blocking the view, it’s a real nuisance. Apps such as PlanIt or Photopills will help or online https://shademap.app/. Don’t plan too tightly, as far as I know the apps only take the centre of the sun into account and not necessarily the entire solar disc.
Weather
Well, the weather is what it is – sometimes good, sometimes bad, and there’s nothing you can do about it, is there? True, but at least statistically speaking, you can improve your chances! You choose a location that has had less cloud cover than others during the season of the eclipse in recent years. You can find the relevant data from the weather services, or better still, go straight to https://eclipsophile.com with a detailed analysis of specific events.
In addition to the statistics, local phenomena should also be taken into account wherever possible. Typical cloud formation over the sea or on mountain slopes at certain times of day. Also, well-known ‘rough’ seas with spray in the air along coastlines and similar conditions.
On the other hand, for eclipses occurring low in the sky, clouds at greater distances are also important. After all, a clear view looking straight up does not help here. For the 2026 solar eclipse in Spain, this is precisely what is covered under https://www.besselianelements.com/cloud-spain-forecast-eclipse-2026/. This will also be a challenge for the annular eclipse in 2028.

Location Scouting & traffic
You can use the tools mentioned above, along with Google Maps and image search. But if at all possible, arrive at least a day in advance and check on the spot whether your chosen viewing spot is really suitable. Find out beforehand whether there are any local events organised for the eclipse, and whether any viewing areas have been set up – regardless of whether you want to visit them or avoid them.
There may also be local road closures to prevent traffic chaos – in Majorca’s Tramuntana mountains, there are at least rumours to that effect. Anyone familiar with the chaos there during the summer at every normal sunset will know why, and access to Cap Formentor has been closed to private traffic during the summer months for years. In general, the Spanish road authority launched a ‘Plan especial de seguridad vial por Eclipse solar total’ (Special Road Safety Plan for the Total Solar Eclipse) at an early stage. Specific measures are likely to be announced at the end of June, and probably only shortly beforehand or even live.
- DGT Traffic restrictions – An Excel file for July and August will be available here, which will no doubt already contain specific restrictions and route changes. Further details will then be available live via the following link:
- DGT Traffic situation / incidencias – Live map showing road closures, traffic jams and roadworks. Click on ‘Cameras’ in the top-right corner of the menu to view the live traffic situation on the motorways on the day of the solar eclipse.
- In addition to Google Maps, there is also https://www.waze.com/en/live-map useful for keeping up to date with the current traffic situation.
Incidentally, the journey home is likely to be even worse than the journey there, as many people will be setting off within a very short window of time after the eclipse. So perhaps you should plan ahead: catch the sunset, back up your data on the spot, and start editing your first photos. Or even set up camp for the Perseids – your wish for clear roads the next morning is likely to come true 😉
Behaviour on site
Common sense should be enough, but given the sort of things you see at spots, even with guided groups…
Just to be on the safe side, here are a few points to refresh your memory 😉
Basically, you need to decide whether you’d rather be on your own (with your group) or would prefer to share the experience with others. For larger groups, the following applies:
- Arrive early – not least for your own sake, so you can get everything ready in peace. But also, of course, so as not to disturb others who may already be filming.
- As always, and at every location: first look in the opposite direction to check whether someone has already taken up position there, as you might walk in front of their camera.
- Stay put – especially just before totality. Nobody wants people running about in front of the camera or even tripping over a tripod
- Shouts of joy and the like are probably part of the experience, but no music (that’s what headphones are for) or other noise
- Drones make noise and annoy everyone else, so keep them on the ground! If you want a shot like that, go to a secluded spot.
- If you’ve got your dog with you, find a secluded spot – you don’t know how it’ll react to the darkness and others might feel disturbed.
- If you’ve got a parasol or similar with you, don’t wave it about in the air out of excitement
- Secure or weigh down anything that could blow away
- Especially for ‘beginners’ with compact cameras: no flash! Read the manual and switch it off, otherwise loads of people will be blinded, miss half the totality, and have loads of photos ruined.
- Even after totality, despite the party atmosphere – people are still taking photos of the partial phase…
Plan B – the weather again
Having taken all of the above into account, you must expect the weather to be poor at short notice – and hopefully only locally – during the eclipse, and you should be prepared for this and have a Plan B (and C). It is best to discuss and agree on the timing and criteria for making a decision in advance, and then act consistently in accordance with them – this will save arguments on the day.
If you arrive a day or two beforehand, keep an eye on any cloud formation at the time of the eclipse and discuss the cloud forecast. Depending on the weather conditions, the forecast for 1–2 days in advance should be fairly reliable. If you decide on a different spot, check the traffic situation and, especially if you’re short on time, try not to drive too far (or too far out of the way) from the path of totality. It’s better to have a total solar eclipse with a few clouds than none at all under a clear sky because you can’t get there in time due to heavy traffic.
https://kachelmannwetter.com/de/modellkarten/sui-hd for Central Europe, or SuperHD Nowcast for up to 6 hours. Parts of Spain are covered by high-resolution FrenchHD. If you need data for areas not covered, you will have to use HARMONIE-AROME from the Spanish AEMET or models with even lower resolution. It may also be useful to check local conditions the day before using webcams from the relevant regions.
A good global source is windy.com, also available as an app.
I won’t be giving any specific recommendations regarding the upcoming eclipses. Use the ‘tools’ I’m providing here and make up your own mind – then it’s not my fault if it doesn’t work out 😉
4. What can you observe and photograph? ⇧
I find myself musing a little – as I mentioned, I’ve never experienced it myself, but when, completely contrary to the countless times you’ve seen a blue sky and sunshine, it gets so dark that you feel like switching on the lights, and bright stars or planets appear in the daytime sky, it really does have an effect on you. If you watch video footage, complete strangers are throwing their arms around each other’s necks; the ‘oohs’ and ‘aahs’ at even the most spectacular fireworks fade into the background. You probably can’t prepare yourself for it the first time.
The rapid drop in brightness at the start of totality is said to be particularly impressive. Even though, due to scattering and reflection from areas outside the umbra, it is still significantly brighter than on a full moon night.
Furthermore, there are shifts in colour – at the zenith, the sky appears dark blue, whilst the horizon turns orange to reddish. This doesn’t quite match the thousands of everyday observations we’ve made – 360° twilight, where the horizon is brighter all around than the sky at the zenith.
Due to the pinhole effect, hundreds of tiny crescent-shaped suns can be seen, for example, beneath trees. For just about a minute, with a very narrow crescent of the sun, striped patterns – ‘flying shadows’ – may be observed on uniform, bright surfaces. This is a scintillation effect similar to the twinkling of stars in the night sky – here caused by varying refraction of the air.
As the crescent of the Sun diminishes, the shadows also become sharper, as the light source becomes more point-like. Capturing this beautifully in a photograph requires a little imagination, and it’s best to save this for the partial phase following totality. Just before totality, it’s important to get everything ready for those fleeting moments and not to forget to remove the filter!
If the sky is clear, the arrival of the umbra is not quite as dramatic to observe. It is pretty much the only thing where cloud cover during a total solar eclipse might have a positive side.
As we know from clouds passing in front of the sun, it gets colder. The perceived change in temperature is significantly higher than the meteorologically correct temperature reading due to the effect of the lack of direct sunlight. But even then, temperatures of up to 10°C have reportedly been recorded (source). Such marked temperature gradients can also lead to air movement – in other words, wind.
It is reported that birds fall silent in the darkness, and during prolonged eclipses, (some) ‘confused’ flowers may close.
Photographically, however, the effects directly caused by the sun probably play the leading role:
Baily’s Beads

After the ‘nibbled-away’ solar disc, this is the first (and last) observable effect. A few seconds before and after totality, individual bright spots are visible at the edge, where light shines through only the valleys of the Moon.
The luminous phenomena are very bright. Roughly speaking, the same exposure settings can be used as during the partial phase with a filter – only now without one. However, as with the Diamond Ring, direct visual observation should still be carried out with eye protection!
(Image taken 4 seconds before totality on 24 August 2017 – Tomruen; CC 4.0)
Diamond Ring

Once most of the “beads” along the string have disappeared and only a small section of the photosphere remains visible in one place, the sun’s disc, with its faintly glowing rim (the inner corona becomes visible), appears with a bright spot, somewhat like a diamond ring.
(Photo by D. Benjamin Miller under CC 1.0, taken on 8 April 2024 in Montreal)
Chromosphere
As the second layer of the atmosphere, it can only be observed without special equipment during a solar eclipse, due to the bright photosphere lying beneath it. The photosphere, which is very thin at 400 km compared to the Sun’s radius of just under 700,000 km, is the source of the light we see. Its thinness also accounts for the Sun’s relatively sharp edge, despite it being a ‘blurry ball of gas’. However, it is not really suitable for clear focusing. The more sharply defined, cooler and therefore darker sunspots in the chromosphere are much better for this. But the focus here is on the chromosphere:

Solar Prominences
These are huge streams of matter that can be seen as filaments across the entire surface using special H-alpha telescopes (which, being very narrow-band, only allow light at a wavelength of 656.28 nm to pass through). At the edge of the Sun, they can also be observed in visible light as bright, reddish arcs. At least with special equipment or during a solar eclipse. Particularly violent prominences can grow up to a million kilometres long and – like flares from sunspots – even detach completely from the Sun: a coronal mass ejection (CME for short). When ejected towards Earth, this disrupts our magnetic field and can lead to auroras. If it gets really intense, they can even be seen as These are huge streams of matter that can be seen as filaments across the entire surface using special H-alpha telescopes (which, being very narrow-band, only allow light at a wavelength of 656.28 nm to pass through). At the edge of the Sun, they can also be observed in visible light as bright, reddish arcs. At least with special equipment or during a solar eclipse. Particularly violent prominences can grow up to a million kilometres long and – like flares from sunspots – even detach completely from the Sun: a coronal mass ejection (CME for short). When ejected towards Earth, this disrupts our magnetic field and can lead to auroras. If it gets really intense, they can even be seen as far away as Tenerife!
Solar Corona
The corona is the ‘halo’ surrounding the Sun – without an eclipse, it too vanishes completely into the brightness of the photosphere. Another topic that falls into the ‘it’s complicated’ category, by the way, is the Sun’s temperature. Whilst it is a cosy 15 million degrees Celsius inside – where nuclear fusion takes place – the photosphere is ‘only’ around 5,500°C. In the chromosphere, the temperature initially drops to around 4,000°C before rising again to about 10,000°C further out. It gets even less intuitive – the gas in the corona is significantly hotter again, at well over a million degrees!

The ionised plasma glows only relatively faintly due to a specific type of scattering involving electrons. How clearly it is visible depends on solar activity and, of course, to a large extent on the exposure and image processing. The brightness decreases significantly towards the outer regions, so HDR techniques are used to ensure the most complete representation possible. Our brain does this automatically – the visual impression cannot be captured in a single image!
The structure originates from the coronal magnetic field, and its appearance changes significantly over the 11-year activity cycle. The solar wind, consisting primarily of protons and electrons, also originates in the corona.
Earthlight
The darkest ‘effect’ is only visible at very high exposure levels. The Earth is, after all – apart from the small dark patch where the solar eclipse is visible – brightly lit by the Sun. Some of this light is reflected, casting a faint glow on the Moon. The contours familiar from a full moon thus become visible too – albeit with much less contrast.
5. How do you photograph the effects? ⇧
If it’s your first total solar eclipse: don’t do it!
Well – that’s what people often recommend, but as a die-hard photographer, would you really want to miss out on the opportunity? I’m going to try, at least, to automate as much as possible and just let the camera(s) run – whatever the outcome. In any case, I certainly don’t want to miss out on the experience because I’m too busy fiddling with settings and focusing on the technical side of things.
Be sure to check Gunther Wegner’s site LRTimelapse.com. He interviewed Mike Shaw, a real expert on the subject (for whom I have previously had the pleasure of providing an illustration for a book).
Looking for inspiration? Alan Dyer has a lovely Gallery:

Photo categories for the solar eclipse
- Timelapse footage using a wide range of focal lengths
- Video – close-ups of the sun or wide-angle shots featuring audio of people observing the eclipse
- Wide-angle shots with a foreground
- Telephoto shots showing the aforementioned effects on the sun, including intricate HDR images
- Composites – using both wide-angle and telephoto shots
If you plan properly and everything goes to plan, you can create some wonderful collages from a time-lapse recording. Planning is absolutely crucial here, as you sometimes have just a few seconds to capture the Diamond Ring, for example. Every setting and every move has to be spot on; you need to know exactly what you want to do, with which camera, and when!
Of course, what you can actually achieve also depends on the equipment you have, or plan to buy or hire, and can actually bring with you to the location. In any case, you can do something with pretty much any kit!
Equipment ⇧
There are no specific requirements for wide-angle shots. However, you should at least have an entry-level DSLR or DSLM – the kit lens should be sufficient. It won’t get so dark that you’ll need particularly high-performance cameras for night shots or ultra-fast lenses.
On the other hand, if you’ve got an action camera to spare, just let it run! Whether for video (with sound!) or for a time-lapse with a wide-angle lens and all the people around it. Or even an Insta360 for a complete 360° view, including the twilight! Set it up, start it and ‘forget’ about it – there are plenty of other things to do or watch!
Basic settings & tips
- File/image format: RAW, not JPG!
Usually 12 or 14 bits instead of just 8 in JPG, giving you much more scope for editing. Furthermore, the white balance can be adjusted during editing without any loss of quality and is not largely fixed at the time of capture, as is the case with JPG - White balance: Sun/Daylight; definitely not Auto for time-lapse and multiple exposures (Auto is fine for single shots)
- Allow the camera and lens to acclimatise in the sun, then focus manually at full aperture – for longer focal lengths, use a solar filter to focus on sunspots. For DSLMs or DSLRs in Live View, use maximum magnification – do not simply set it to the infinity mark! Even telescopes need a moment, depending on their design. If you want to be on the safe side, check the focus again a few minutes before totality. Removing the solar filter has no effect on the focus; do not waste time refocusing after removal!
- For wide-angle shots, stop down by 2–3 stops depending on the lens, but observe how lens flares form and whether you like the look or not. For telephoto shots, pay even closer attention to the formation of lens flares and test beforehand (e.g. on a distant mast light) – an image of a ‘string of pearls’ with lots of rays radiating outwards is unlikely to be to your liking. A diamond ring, on the other hand, might have a certain appeal?
- Use a lens hood
- Test each lens to see how it reacts to the bright sun with lens flares. Also check how the flares caused by stopping down
Tripod and intervalometer / remote release
When taking wide-angle shots, it’s highly recommended to plan your composition in advance, set it up on a tripod and adjust all the settings beforehand. Then all it takes is a press of the shutter button, without having to fiddle about for ages. It’s better to use a remote shutter release, which you can keep in your hand at all times, so you don’t shake the shot or even knock the camera over. They don’t cost the earth and I would definitely prefer them to a smartphone app – the good old mechanical button is much easier and more reliable to use.
If you’re taking continuous shots for composites or time-lapses, an interval timer is a must. For ‘pros’, a clear recommendation is the LRTimelapse Pro Timer in the latest version 3.5 (affiliate link), see the blog post here. Of course, there are internal ones too, but with those you need to know exactly what you’re doing. For instance, the camera is locked for exposure adjustment, intervals aren’t always precise, and they often have limited settings. With an external interval timer, you can also change the camera battery or readjust the focus without ‘throwing off the rhythm’.
With wide-angle lenses and no manual operation, there aren’t really any major requirements for the tripod and head, and even a small, not-quite-as-stable travel tripod will do the job.
The longer the focal length, however, the more stable the tripod and head need to be. The combination becomes both heavier and more sensitive to the slightest movements! If you have to manually re-centre the shot repeatedly due to the lack of tracking (see below), you don’t want to leave it to settle for tens of seconds until the next shot can be taken without camera shake. So please use ‘thick’ tripod legs with a sturdy adjustment mechanism, non-slip feet (spikes?) and keep the centre column retracted!
If there’s no risk of anyone walking into the shot, feel free to lower it as far as possible and, if necessary, spread the tripod legs further apart to reduce the risk of tipping. The lower it is, the less wind resistance and the smaller the lever arm!
On soft ground, press your feet into the ground firmly but gently, or find a spot where your feet can rest on stable stones.
Perfectionists will, of course, have a beach shelter or similar with them to block the wind. Thanks to looking slightly upwards, the wind can usually be kept away from the equipment much more effectively than with time-lapse photography. After all, the wind usually blows cheekily from the front, where you simply can’t put anything in its way 😉
A weight (a shopping bag filled with sand or stones) also helps to stabilise the tripod – but under no circumstances should it be suspended so that it swings freely!
The ball head is great for quick adjustments in all directions – but not for telephoto shots during eclipses. Here, it’s always a matter of making small corrections with heavy equipment, so you should use the right gear: a 3-way gear head.
With a bit of practice, you can keep the sun perfectly centred by turning the adjustment knobs simultaneously. Without having to release any locks and without the risk of the whole setup tipping over. It doesn’t have to be the Manfrotto 405 for €500. It’s certainly not worth it just for a solar eclipse, but an affordable alt-azimuth mount such as the Bresser Twilight I AZ, complete with a steel tripod and an 8 kg load capacity, might also be worth considering here.
If the eclipse takes place high in the sky, make sure you can tilt your head back far enough to see it.
Telephoto shots – Focal length ⇧
When it comes to capturing the finer details of the effects of a solar eclipse, you need a much longer focal length. You shouldn’t even bother with anything under 200 mm (full-frame); 400–600 mm is better. However, you don’t need more than about 800 mm if you want to capture the corona. Depending on the ‘depth’ of the shot and solar activity, the image ultimately needs to include several times the radius of the Sun, not just the solar disc itself.
However, if the focus is specifically on the effects directly on the Sun’s surface – Baily’s Beads, the Diamond Ring, the chromosphere and prominences – a focal length of 1,500–2,000 mm or even more is perfectly acceptable. However: the demands on tracking increase, as does sensitivity to wind. Furthermore, transport quickly becomes an adventure – the use of such long focal lengths should be very carefully considered.
I am using the following image from the late “Mr. Eclipse” Fred Espenak, a former astrophysicist at NASA, who has not only witnessed and photographed over 20 solar eclipses, but whose field of research was also the Sun. It’s well worth having a browse through his website, by the way.

Admittedly, the Sun still looks a bit lost even at 400 mm, but most modern cameras have such high resolution that you can easily crop the image quite a bit. A 150–600 mm lens is still affordable and can be used for other purposes. Lenses with focal lengths above that become more specialised in their use and more expensive. BTW: You can hire one if you book early enough.
Cameras – a DSLR/DSLM is essential for the totality. Generally speaking: the newer the better, because it offers more flexibility with exposure and, above all, faster processing/storage. Because during the totality, it’s all about “bracketing like hell” (Mike Shaw). So extensive exposure bracketing is required, and you don’t want to wait 1 second per shot before you can take the next one. However, speed is of no help if the camera cannot handle sufficient exposure bracketing and the external control is significantly slower. It’s just more complicated than you might initially think…
In the partial phase, it’s all about focal length and the option to attach a sunshade to the front. There’s plenty of light, so even a small, ‘weak’ sensor will do the job. A ‘zoom monster’ like the Nikon P1000/1100 or even small compact cameras with x-fold zoom, such as older Powershot models from Canon, perform very well here.
Tracking ⇧
This is necessary/advisable for long focal lengths for two reasons:
- Longer exposure times during totality without motion blur caused by the Earth’s rotation (a rough rule of thumb for full-frame: max. 500/focal length – for the fine structures of the corona, use only half this value)
- To keep the Sun within the field of view throughout the various phases.
The catch with long focal lengths, however, is that they require precise tracking even with heavy equipment. The small photo-tracking systems used for Milky Way photography are quickly overwhelmed, and costs can very quickly reach four figures.

Reason 1 can be circumvented by using higher ISO settings or by taking advantage of ISO invariance (where the sensor supports this).
Reason 2 can be easily circumvented for composites by manually re-centring the image every few minutes during the partial phase. During totality, check whether tracking is necessary at all, depending on the duration and focal length. Spain 2026, with, say, 1 minute 30 seconds and 600 mm: the Sun moves less than one solar diameter ‘down to the right’ across the field of view. So, using a solar filter, position the bottom-right ‘corner’ just in front of the centre of the frame 30 seconds before totality, and by the end of totality, the top-left corner will be there. I consider this perfectly acceptable.
Tracking isn’t actually that straightforward during the day, given the precise alignment required. It means more kit, another piece of equipment to operate, and yet another potential source of error. So think carefully about whether it’s absolutely ‘necessary’ – e.g. for a time-lapse covering the entire sequence…
Daytime alignment ⇧
As mentioned, if you’re only interested in the totality, tracking is hardly necessary. With longer focal lengths, however, you need to be careful not to introduce motion blur caused by the Earth’s rotation due to the exposure time. If you use tracking because of a long focal length or because you want to track the partial phases seamlessly, you need to align it properly. In other words, align the axis of rotation (more precisely, the hour angle/right ascension axis) exactly parallel to the Earth’s axis of rotation in order to compensate for this rotation. At least with equatorial mounts. At night, this works perfectly with the help of the North Star – either manually or conveniently via alignment routines built into the control system, all of which, however, must be able to ‘see’ stars and planets. Ways to deal with this:
- Align the telescope the night before and leave it as it is
- Align the telescope the night before, mark the position of the tripod legs with meticulous care, do not change anything, and the next day return it to exactly the same position
- Polar height = geographical latitude. Set this the night before using Polaris during the north-alignment routine. Provided the mount has been meticulously levelled using a spirit level, this should ensure very good reproducibility.
- Alternatively, use only a rough estimate via the mount’s scale or a smartphone protractor.
- Polar alignment/azimuth
- Roughly using the compass function of a smartphone app.
- Find a clearly visible landmark directly north of your current location using an online map – or better still, using PlanIt! or a similar app.
- Rotate the objective lens/telescope from the home position exclusively along the right ascension axis towards the horizon and use the azimuth screws to centre the landmark. Provided the objective lens/telescope is positioned exactly along the right ascension axis on the mount, this should result in a fairly accurate alignment. However, this would mean the exact altitude is lost again.
- Use an app with a function for polar alignment during the day – one that ‘knows’ the required polar altitude via GPS and uses the smartphone’s sensors, including the magnetic compass, for convenient alignment. As precise as the sensors are…
- Unfortunately, this is only available for Apple, but the Polar Scope Align Pro is very often recommended here. For Android, the closest equivalent is probably the PolarAligner Pro App.
Driftalignment
The rough methods described above are more than adequate for the few minutes of totality. If you want even greater precision – for example, for seamless time-lapse footage of the eclipse, including the partial phases, using a long focal length – you’ll need to fine-tune things a little further. If the solar eclipse permits, as in Europe in 2026, the movement (drift) of the sun, which is positioned in the south, is observed after a rough alignment. Based on this, the azimuth error can be minimised. If it is further to the west, the elevation error in the alignment can then be corrected.
Auch hier: Üben, üben, üben!
Alternatives to traditional tracking:
Skywatcher Solarquest – An azimuth tracking mount designed specifically for solar observation, featuring what is likely a unique automatic sun-tracking system using GPS and brightness sensors to centre the Sun. With an RRP of €379 (excluding the tripod), it’s actually reasonably priced – but here’s the catch: the maximum load capacity is 4 kg. That quickly becomes a limitation with long focal lengths, and with short ones, depending on the exact application, you might not even need it at all…
A similar catch, and less accurate due to the lack of brightness sensors, but almost three times as expensive: Benro Polaris. This is a mechanically very robust 2-way tripod head with numerous features – including (azimuth) star tracking. Unfortunately, it also has a few poorly thought-out minor flaws and a neglected app – so I can’t really recommend buying it. There is an external initiative to make this device, which is actually mechanically sound, truly suitable for astronomy – see Alpaca on GitHub. The main advantage during the day is definitely the ability to align the mount using GPS and the smartphone’s sensors to point north. In the second step, the mount pans to the selected star or planet – in this case, the Sun. Centring the Sun using the on-screen joysticks in the app improves the precision.
Unfortunately, the tracking accuracy for the Sun is rather limited and anything but ‘smooth’, as can be seen in the 50-minute time-lapse video:
Sunprotection ⇧
No, not sun cream for your skin or ordinary sunglasses to protect your eyes – we’re talking about heavier-duty gear here 😉
Eye Protection
Ordinary sunglasses do NOT protect against looking directly at the sun for any length of time – and certainly not if they have tinted lenses or similar! For anything other than the crystal-clear totality, special, certified solar eclipse glasses are absolutely essential. Get them in good time; they don’t cost the earth but tend to sell out just before an eclipse. Please don’t skimp here – buy from well-known, reputable retailers, not from Ali-whatever!
These things may look ‘cheap’ and are often made of cardboard. However, the key factor is the protective film used, which not only has a very low transmittance of around 1/100,000 for visible light. It also reliably blocks all radiation outside the visible spectrum, i.e. IR and UV light. This can damage the eyes just as much, and we wouldn’t even notice it due to our inability to perceive it. More information on this at the NASA.
Regulations also cover direct observation of the sun, of course. In addition to the transmission value itself, ISO 12312-2 specifies the important wavelength range for which this value must apply. For high-energy UVA and UVB radiation, the transmission factor must not be greater than that in the visible spectrum. Transmittance for IR radiation may only be 3% higher. No such requirement applies to photographic ND filters.

Equipment protection
When shooting with a wide-angle lens, no special protection is required. Cameras are certainly built to function in bright, unobstructed sunlight and to photograph it. I’ve done this dozens of times over many hours for time-lapse shots without any damage. Here, you need to consider whether you want to use a standard ND filter to achieve long exposure times and the desired motion blur for beautifully ‘smooth’ time-lapse videos, despite people moving around. However, this would need to be removed during totality to avoid having to work with very long exposure times or high ISO settings.
Nevertheless, a strong filter can be useful or even necessary – if you want to capture the changing crescent of the sun during the partial phase. In that case, of course, nothing of the foreground will be visible, and you’ll need to take a separate image with the foreground for a composite image, so you can combine it with the sun shots.
For telescope photography, a special solar filter is absolutely essential. For purely photographic reasons alone, to be able to capture the sun with any detail at all – that is, the sunspots. Otherwise, even with a closed aperture and fast shutter speeds, you’ll end up with nothing but a bright, washed-out spot. Furthermore, long focal lengths simply direct a lot of energy onto the sensor, which is then quickly and permanently damaged by the heat generated.
Fundamental principle: Sun protection filters are always fitted at the very front, as the first element in the optical path. Therefore, clip-in filters are not ideal when positioned directly in front of the sensor – the light energy strikes the filter in a concentrated beam.
Anyone who loves their camera should – as already explained regarding eye protection – avoid standard ND filters – there is no guarantee that they block IR and UV light as well as visible light. So be sure to check for explicit suitability for solar photography or verify via the transmission curve that the IR and UV ranges are blocked just as effectively!
High-quality glass filters are useful for shots with short focal lengths – though it’s best to avoid standard screw-in filters. Removing and reattaching them during totality takes too long, and you might even end up misaligning the lens or camera in the process. Filters with magnetic holders are far more suitable here. A universal holder is screwed into the filter thread of the camera lens, and the required filter simply attaches magnetically without the need for fiddling with screws. From KASE-Filter, for example, the KW Revolution – However, as an ND 5.0 filter, it reduces the light by almost 17 f-stops, which is quite a lot when using ‘slow’ lenses and can lead to unnecessarily long exposure times. With the Adaptersystem from KASE (similar versions are also available from other suppliers) you can also attach and detach any screw-in filter magnetically. NiSi offers the Pro Nano ND 100,000, and K&F Concept offers the Nano-X with the same density. According to Alan Dyer, the three are of a similar quality. According to the chart on the manufacturer’s website, the Hoya PROND100000 also filters IR light like the visible spectrum and even more effectively in the UV range. With 16 2/3 f-stops, all of them filter significantly more than the Baader film described below.
Other internationally renowned providers: https://thousandoaksoptical.com/, https://www.kendrickastro.com/solarfilters.html and https://seymoursolar.com/
Baader Planetarium GmbH is likely to be one of the market leaders in this field and is readily available in Europe. Photographers can choose from their ready-made filters, available in diameters ranging from 80 to 280 mm, of the type BDSF OD 3,8 to be fitted onto the tube/lens or the AstroSolar® Photo Foil OD 3.8 for DIY use, measuring 20×29 cm. The film transmits around 0.016% of light, thereby extending the exposure time by approximately 12.7 f-stops. This is far too little for visual observation – it must be used exclusively for photography! However, unlike typical ND 5 films for visual observation (4 f-stops more than ND 3.8 or 16 times the exposure time), short shutter speeds are still possible without risking damage to the camera. Under https://astrosolar.com/ there is more information from Baader on this topic.

However, you really must take care not to accidentally attach the ND 3.8 filter to the spotting scope and use it for observation. Even with traditional SLR cameras, looking through the viewfinder is strictly forbidden! Equipment that is freely accessible must be protected so that overly curious people cannot come to any harm!
Protection is mandatory during the partial phase and “prohibited” during totality. Depending on the intended shot, the filter must therefore be removed quickly and without camera shake, exposure settings may need to be adjusted, and the whole process repeated in reverse. Given the brief duration of totality – and particularly of Baily’s beads and the diamond ring – everything must be “just right”, so:
Practise, practise, practise
H-alpha photography of the Sun ⇧
We’ve already seen this in the structure of the Sun – the hydrogen spectral line at a wavelength of 656.28 nm – a beautiful dark red. This is also familiar from night-time photography, where special filters allow emission nebulae such as Barnard’s Loop in the Orion region to stand out. When observing the Sun, an H-alpha filter helps to reveal details that would otherwise be obscured by the bright white light. The structures of the chromosphere, such as solar flares and solar flares, stand out particularly clearly. The same applies to the larger prominences at the Sun’s edge.
However, the filter must be extremely narrow-band – less than 0.1 nm, compared to 6 or 12 nm for ‘normal’ H-alpha filters. This is complex and expensive, and is not achieved using a specific absorptive filter layer, but rather via a so-called etalon. This causes the light to be reflected back and forth between two precisely parallel layers. When correctly constructed, the H-alpha light waves, with their ‘peaks and troughs’, lie exactly on top of one another on the outward and return paths (constructive interference) and can then emerge from the slit. All others cancel each other out (destructive interference) – well, unfortunately not all of them. At regular intervals, there are always wavelengths that an etalon allows to pass through. But these are much easier to block, as they are broadband. This principle was described by two Frenchmen over 130 years ago and is named the Fabry-Perot interferometer in their honour. For large apertures, an energy protection filter is also placed in front of the etalon. Further details are available from the developer at a leading manufacturer (Lunt).
To cut a long story short – you need a specialised solar telescope with components that are designed to work together. Unfortunately, these cost €1,000 and upwards. And, sadly, there’s nothing straightforward with full-frame support either, as the components are significantly more expensive at that size. At LUNT, the 34 mm block filter costs a good €2,000 extra compared to the 12 mm model – for full-frame, you need a minimum 44 mm image circle. For ‘normal’ images of the Sun, however, this isn’t a problem at all – you’re filming with planetary cameras anyway, not taking photos, and thanks to their small sensors, the focal length can remain manageable.

This is because an image as rich in detail as the one above is not a single frame; like all high-resolution images of objects in the solar system, it is typically produced using a technique known as ‘lucky imaging’. This involves capturing up to several thousand images, which are usually filmed at the highest possible frame rate rather than taken as individual photographs. It is only through automated quality assessment and selection, combined with the merging of the best exposures and further processing – as is the case with deep-sky objects – that such results can be achieved. But even during observation or with single images, this imaging technique delivers far more than white light photography.
So, for anyone who wants to stand out from the thousands of identical, ‘nibbled’ images of the Sun: a solar eclipse in H-Alpha 🙂
Finding the Sun
‘Er, what’s that all about?’ some of you are probably thinking, but with a filter everything is pitch black and you can only make anything out when the sun is directly in your field of view. So with long focal lengths, you really need to aim carefully, and without a filter you should NOT approach the sun – you should put the filter on quickly instead! A simple trick is to look at the shadow of the lens on the ground – if it becomes smallest when you pan and tilt, the lens is pointing towards the sun. That should usually be enough to get it roughly in the frame, and you can then fine-tune it as normal via the display or viewfinder.
A “sun finder” like the ones offered by Kendrick Astro is even better; I haven’t found anything at a reasonable price from the EU/Germany – but it’s also relatively easy to build yourself and calibrate in advance.

Wide-angle shots ⇧
One aim here might be to capture the completely eclipsed sun with a terrestrial foreground, whilst conveying a little of the special atmosphere. The camera’s automatic exposure settings will generally do the job, but you should reduce the exposure by perhaps one stop – after all, you don’t want it to look as bright as day.
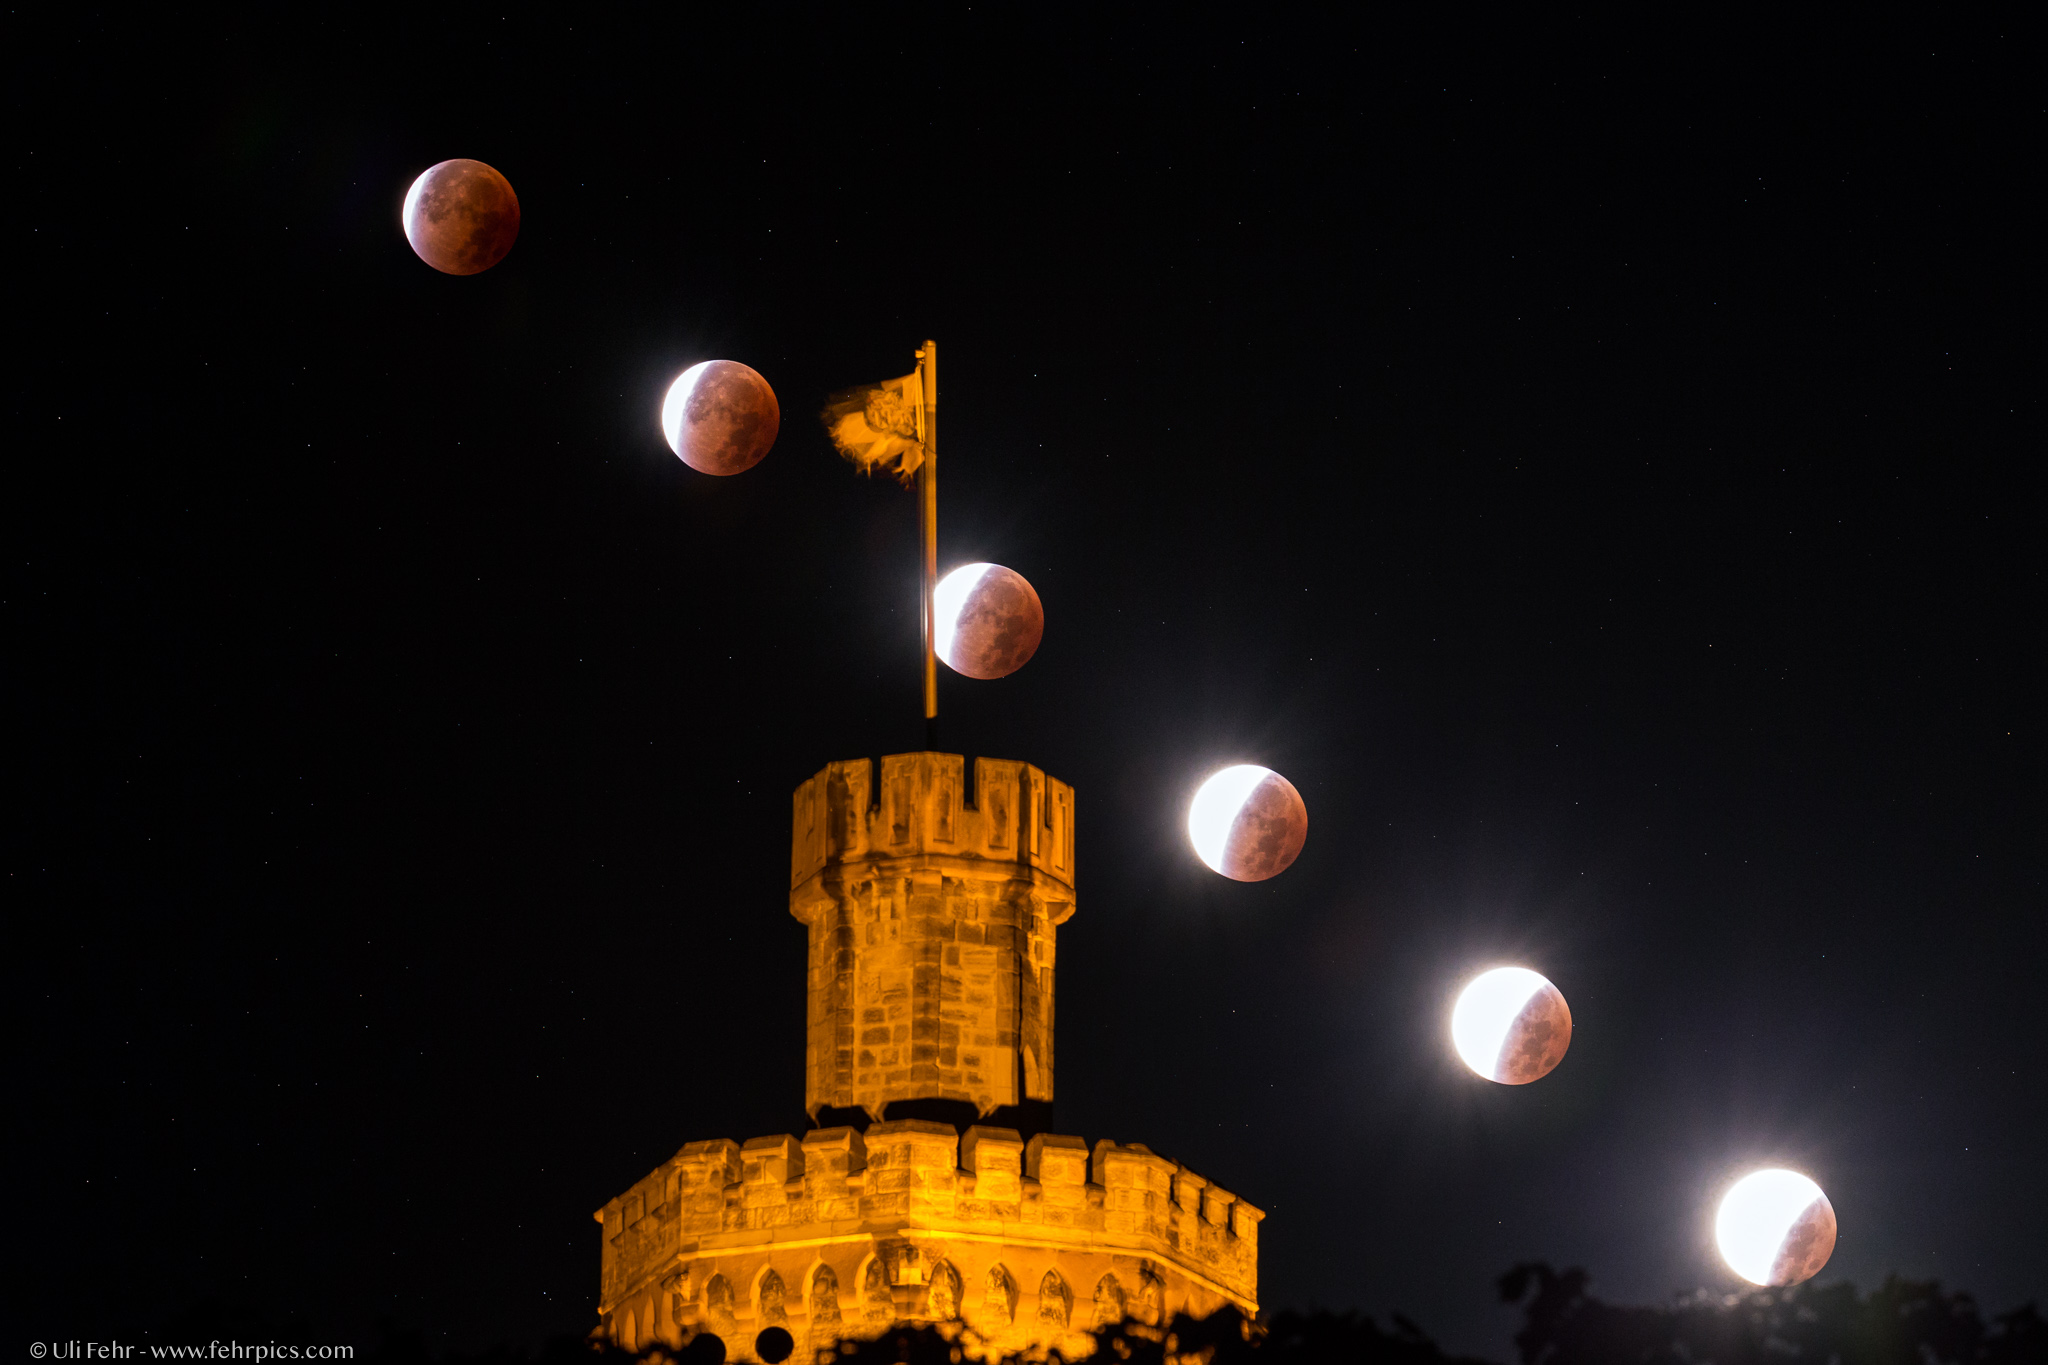
Composites are also a good option, using the various partial phases in the original locations of the sun, as shown here in this example of a lunar eclipse – for once, a photo of my own 😉
How well this works depends on the height and distance of the foreground, and on the sun’s altitude during the eclipse. The flatter the landscape, the easier it is to incorporate it into the shot. This makes it easier to find subjects that can be included using a slightly longer focal length, and the sun will also appear slightly larger. At 20 mm, it is always more or less just a small bright spot – whether it is partially eclipsed or not…
A look at Stellarium or other Software of this kind is also essential for identifying which bright planets or stars are near the eclipsed Sun and can be captured using the appropriate focal length. A time-lapse sequence is also ideal for this, as it allows the increasing or decreasing visibility of a star or planet to be shown over time.
In 2026, we would have Jupiter, which fits into the frame at 135 mm in landscape format – though only a few degrees above the horizon. To the left and above the Sun and Moon is Regulus, which is likely to be photographically visible only under ideal conditions. In 2027, even with a 300 or even 400 mm lens, the much brighter Venus, standing almost directly above the Sun and Moon, will be visible – though due to the height of the solar eclipse, it won’t be possible to include a foreground in the shot.
PlanIt!
Let’s say you’re brave enough to give it a go in Majorca, with its picturesque view of the Bay of Palma; PlanIt! will display the following view at the start of the partial phase:

After all, with a 75 mm focal length (no longer really wide-angle, but not quite telephoto for the sun either), you could capture the first partial phase, totality and the reappearance of the sun until it sets behind the mountains.
For a composite, as mentioned, take (or have someone take) shots at fixed intervals. When it comes to the contours of the sun during the partial phase, a solar filter is essential. Test the exposure in full sunlight, then stop down the aperture slightly, as is usual for landscape photography, to improve image quality. This also gives you a bit of leeway with the focus due to the increased depth of field.
Normally, I would shoot in M mode with a fixed exposure, as the brightness of the sun does not change during the partial phase – the area simply becomes smaller. However, as the sun will sink close to the horizon during the 2026 eclipse, I might opt for A mode instead to account for the sun becoming darker due to increasing extinction. The exposure compensation should then be set so that the automatic exposure system delivers the desired result in advance when the sun is at its brightest. As the foreground is completely ‘washed out’ when exposing for the sun and the raw footage is hardly suitable for a time-lapse, relatively long intervals are required. Alternatively, you can use automatic exposure bracketing to capture multiple exposures of the sequence.
As totality begins, take the filter off; the exposure remains the same, and at 75 mm it’s a bit of a gamble, but you might just manage to capture a diamond ring. Then, during totality, you really only need one image as a background into which the individual suns can be pasted. But it has to be just right – so shoot an extensive exposure bracketing sequence in A-mode – then you’re sure to have something suitable. While you’re at it, take an extensive exposure bracketing and see if you can’t bring out the corona nicely into the distance.
For a few shots between the end of totality and sunset, the filter would need to be put back on so you can add the small and other crescent-shaped suns.
This is just an example of what I would consider – it doesn’t have to be complete or perfect.

Timelapse
Definitely 😉
It’s particularly great for visualising the sun’s path across the sky, changes in brightness, and shadows that disappear and reappear. If you’re focusing more on the landscape and shadows, shoot in A-mode without a neutral density filter and opt for shorter intervals and plenty of shots – you can always speed things up later. Use a wide-angle lens (14–35 mm) with high resolution and apply the Ken Burns effect in post-processing. Or add even more ‘pep’ with a subtle pan-tilt and/or slider movement with a suitable foreground – a flower closing and opening again, perhaps?
When it comes to the partial phase, you’ll need longer focal lengths, a solar filter is essential, and you’ll have to work quickly with tracking. Across both partial phases, this is already a challenge with daytime alignment without guiding, and a bit of a gamble without repositioning in between. Changing filters around totality must also be done carefully to avoid camera shake. Or you could plan in the odd cut from the outset – it’s not the end of the world.
I hope it goes without saying that you’ll be using LRTimelapse (affiliate link) for editing 😉
Telephoto shots ⇧
Of course – a smooth transition, but here I’m primarily referring to the details of the effects mentioned above. Particularly for the 2026 eclipse, where the sun will set whilst partially eclipsed, telephoto shots with a foreground are also of interest.
We’ve already covered focal lengths in the equipment section, so let’s look straight at what we can expect in terms of exposure for capturing details of the sun.
If we take the exposure during the partial phase with an ND 3.8 filter (transmittance 1/6,300; 0.016%) as a baseline (depending on other factors, e.g. 1/2000 s), then the brightness of the eclipse phenomena without a filter should be roughly as follows:
- Baily’s Beads: 0 EV (1/2000 s)
- Chromosphere: + 1 EV (1/1000 s)
- Prominences: + 2 EV (1/500 s)
- Innermost corona: + 4 EV (1/125 s)
- Diamond Ring: + 5 EV (1/60 s)
- Middle corona (1 solar radius): + 10 EV (1/2 s)
- Outer corona (3 solar radii): + 12 EV (2 s) – up to this point, one can/should ‘always’ calculate
- outer corona (8 solar radii): + 14.3 EV (10 s) and above – only reproducible under optimal conditions and with significant post-processing effort
- Earthshine: + 15.3 EV (22 s)
How much of the corona can or must be captured naturally depends on the focal length as well – at 1,000 mm, the Sun fits into the short side of the frame just three times, so it extends only 2 solar radii outwards and we need to expose ‘only’ up to +11 EV. Every solar eclipse is different, and I must admit I’m quite unsure, particularly regarding the extent of the corona that can be captured.
If the Earth’s glow is to be captured, making contours on the lunar disc visible, then 15 (!) more exposure stops are required than for Baily’s Beads.
It becomes clear why an ND5 filter is not suitable for photography and that, with a slow lens and possibly a teleconverter (doubling the focal length also ‘costs’ 2 stops of brightness!), one quickly reaches the limits. Another factor argues in favour of using the fastest possible lens and/or the Baader ND 3.8 film: Thanks to the shorter exposure times, the exposure bracketing sequence is captured much faster. This results in less movement of the Moon; automatic alignment with HDR software is a few pixels more accurate, and thus the corona structures are sharper. A second aspect for high standards: a much larger number of exposure bracketing sequences can be captured for stacking.
Calibration frames
Anyone who wants to rival NASA’s top-notch imaging conditions and isn’t put off by unusual processing techniques should capture flats, darks and bias frames as is standard in the deep-sky photography workflow, and take a look at the section on image processing 😉
Flats correct vignetting and lens/sensor spots – several images are taken at the same aperture as the ‘lights’ from a uniform surface without any mechanical changes being made – no change in focus, no removing and reattaching the lens, and ideally not even a change in the setup’s position. A special flat-field box, a tablet with a uniformly lit display that is also moved/rotated, or a few sheets of paper in front of the lens pointing at the cloudless sky. Regardless of fancy high-end gear, flats are a good idea anyway! If you have them, you have them, and in the worst case, you simply won’t need them.
Darks (same exposure time as lights) and biases (minimum shutter speed) at the same gain/ISO and the same sensor temperature as the lights, with the sensor 100% covered, reduce noise – to put it simply.
Exposure bracketing ⇧
Pretty much every camera should offer this – check for the setting where, once the shutter button is pressed, all the set exposure levels are captured without having to press the shutter for each one individually (e.g. Auto Exposure Bracketing or Continuous Bracketing). On some models, this can be combined with the self-timer to avoid camera shake – otherwise, a remote or interval release is essential.
However, very few manufacturers are likely to have anticipated such extreme differences in brightness as we need to cover – which, in a way, is hardly their fault. Historically, the function was not intended for HDR, but simply to take shots slightly above and below the exposure reading quickly and easily, in order to obtain a correctly exposed image. Generally speaking, you can set more than three or five images, but even with 7 steps, you would need to set 2 EV increments (which is often not possible with a high number of steps) to cover the dynamic range. However, the exposure increments for detailed and seamless-looking results should be smaller – more like 1 to a maximum of 1.5 EV.
If we stick with the example above and want to capture the corona extending outwards from Baily’s beads by 3 solar radii, the central exposure time would be 1/15 s. This is set on the camera in M mode. With the exposure bracketing, we would need to cover a range of 6 EV both above and below this value. With 1.5 EV steps, a total of 9 images would need to be taken: the middle image at 1/15 s, 4 images ‘upwards’ (+1.5 / +3 / +4.5 / +6 EV) and the same in the direction of less exposure. Even if the overview at HDRSoft from 2024 – there are very few cameras that offer that many settings 🙁
So, manually splitting it into two or three exposures – that obviously takes time, what with adjusting the exposure time and taking multiple shots. What’s more, you end up spending a lot of time fiddling with the camera settings instead of enjoying the eclipse. Then, of course, there’s the option of using external control for the exposure series, right up to full automation. Lucky are those who DON’T have a Sony 😉
extended bracketing ⇧
- CamRanger – app-controlled, completely overpriced (€449) hardware that connects to the camera. Once the sequence has been ‘programmed’ or triggered, the app does not need to remain connected. A cheaper mini version is available for Nikon and Canon only, whilst the Camranger 2 is also compatible with Sony and Fuji.
- Helicon Remote – for Canon & Nikon (USB/Wi-Fi) and some Sony cameras (USB only). Up to 20 exposure steps, though from 1 EV onwards only in whole steps. Runs on Windows, macOS, Android and iOS for €64, or on Android/iOS only for €41.
The steps were adjusted following contact with support, but unfortunately the hardware support for Sony isn’t quite up to scratch yet and the controls are very slow. - Cascable Studio – available for iOS and macOS, it controls Canon EOS, GoPro, Nikon and Sony cameras via USB, and others via Wi-Fi or a network. It’s free, with in-app purchases required for automation features. Paying €9 a month just to uninstall it straight away might be acceptable, but €60 a year or a one-off payment of €100 is rather steep.
- Camera Connect & Control – App for Android and iOS but hopelessly outdated, at least for Sony. The compatibility list does, however, include the Nikon Z6 III and the newer R-series models from Canon.
- qDslr Dashboard – Free app for Android, Windows, Mac, Linux and Raspberry Pi. Can control multiple cameras via USB or Wi-Fi, as well as via DDTServer. There hasn’t been an iOS version for years because Apple removed it from the App Store following a single complaint. Nikon and Canon seem to work quite well as usual; Sony depends on the model…
- For older Canon models: MagicLantern – you can combine almost any HDR series with the interval function.
Full Automation ⇧
The totality lasts only a few minutes, and phenomena such as the ‘Diamond Ring’ are visible for just a few seconds. The thing is, with the Diamond Ring, you might take three test shots to be sure of getting the exposure right, but you’d then take as many shots as possible as quickly as you can. Or even take dozens of shots in burst mode to catch that 1/10th of a second with the most stunning appearance. However, a massive exposure bracketing series for the entire corona would simply be a waste of time.
The idea behind automation is to use precise location and exact time (e.g. via GPS) to know the exact moments of the relevant contacts and automatically run the precisely matching sequences. There is also an audible reminder to remove the solar filter. If it works, you can enjoy the eclipse yourself without being tied to the camera, or you can work with several cameras simultaneously – or have them run automatically.
Solar Eclipse Workbench – for Mac, Ubuntu and Windows, it is one of the few tools currently being actively maintained, compatible with modern computers and ready for the solar eclipses of 2026/2027. Canon and Nikon are supported, whilst Sony is causing the usual difficulties – the developer is working on it; at the moment, the issue – at least for the new A7V – seems to stem from a lack of support from an external CLI tool being used.
eclipseClick – ‘New’ software from a software developer and amateur astrophotographer for Windows and Mac. The workflow is very similar to Solar Eclipse Workbench, but without the need to type commands into the macOS Terminal – simply launch the software and work via the GUI as ‘usual’. It is designed to control up to three Canon, Nikon and Sony cameras, even with different exposure programmes, as defined using a Script Wizard. The contact times are determined precisely for the selected eclipse based on the (GPS) coordinates. Simulation of the exposure programmes to test in advance whether the buffer/storage is fast enough, etc. As we’re talking about fractions of a second, the system time is conveniently synchronised via GPS – but not the one built into the MacBook. Key features are only available in the paid Pro version for $60 – multi-camera support is an additional $20 add-on. Even after dozens of emails back and forth, the Sony A7V is still not recognised; the A7R III cannot be connected – only the A7S III could be made to work at all. I am also in contact with the developer regarding this…
SharpCap – a well-established astro-imaging software package available only for Windows, with scripting capabilities in the Pro version for €17 per year. You do need a bit of an understanding of Python, or alternatively, the ‘Advanced Sequence Editor’. I can’t say anything about camera compatibility at the moment.
Further options to check out for yourself, though many are unfortunately out of date:
- Solar Eclipse Maestro for Mac – great software for controlling up to 4 cameras via USB, specifically designed for lighting setups, but as of 2019, it’s stuck in the 32-bit world. On newer Macs, emulation probably won’t work – leaving an old MacBook from 2012–2015 with USB-A 3.0 ports for around €100, but which modern cameras can it control?
The updates announced for 2023 and 2024 have unfortunately not materialised. - Solar Eclipse Timer and Camera controller – Windows software designed exclusively for controlling Canon cameras. It’s a bit old, but it still runs on Windows 11.
- Eclipse Orchestrator – Windows-based and, as of 2024, reasonably up to date, even if the website isn’t in some places – for Canon and Nikon. Many useful features are only available in the Pro version, which costs just over 100 US dollars.
- CaptureEclipse – Available only for Mac and Canon; new version 3.0 announced for release AFTER the 2026 solar eclipse
- EclipseDroid – an Android app for older Canon and Nikon cameras that isn’t exactly up to date either
- Backyard EOS / Nikon (Windows), N.I.N.A. (Windows) and, of course, similar general-purpose astronomy software can also be used, provided it supports scripts – which you’ll then have to write yourself.
The alternative is simply two exposure settings that you switch between manually:
- Partial phase (with filter!): Fixed exposure. The brightness of the visible solar disc does not change, so there is no need to adjust the exposure. Exception: if clouds roll in, or if the eclipse takes place close to the horizon, as in Spain in 2026. You may wish to test on site 24 hours beforehand; Xavier M. Jubier’s calculator takes extinction into account when the sun’s altitude is entered.
- Totality (without filter): run through a continuous series of exposures without stopping. For the corona alone, at distances ranging from 0.1 to 8 solar radii, 10 stops are specified – it becomes significantly darker as the distance from the sun increases.
6. How do you edit the footage? ⇧
First off, just the standard tools of the trade in your image-editing software of choice – nothing too complicated. Obviously, with time-lapse shots featuring the sun, you need to be careful with the exposure and ensure you don’t introduce any flickering during editing (stay away from content-sensitive sliders – use the gradation curve instead), but the real challenge lies in accurately depicting the corona.
As soon as the dynamic range of the scene exceeds what the camera can capture in a single image, several images with different exposures must be combined. This is no trivial matter in itself, depending on the subject, and there’s another problem waiting: the high dynamic range you now have in a file must be compressed again in such a way that it can be displayed on ‘standard’ display devices. Not all devices can display deep blacks and bright whites, and the ‘range’ between black and white is also limited, non-linear, etc.
Numerous mobile devices, some TV monitors and specialised HDR monitors in the computer sector now support a far higher dynamic range. Unfortunately, this is still not entirely straightforward, and by no means all online platforms are capable of handling it.
Editing Corona Images
- Precise alignment (registration) of all images in an exposure series
- Create HDR
- Optional: Stacking multiple HDR results
- Post-processing – bringing out textures, sharpening
It looks straightforward, but as always, the devil is in the detail. But first things first – feel free to skip straight to step 2 and see what you get and how happy you are with it so far!
1. Registration
Sure – if you’re working without tracking, the Sun moves quite noticeably and it’s obvious that you can’t simply overlay or combine it into a single image – it would be hopelessly out of focus or blurred. But even with tracking, the images aren’t aligned precisely enough to capture the fine corona structures for optimal results.
Well then – let’s just have a software programme align them; surely any HDR programme, Lightroom, Photoshop and the like can do that? Well, that might work, but generally speaking, it doesn’t, and above all, it isn’t precise enough. The problem lies in the extreme differences in brightness between the images, which make it extremely difficult for traditional algorithms to find matching structures.
OK, so let’s look at specialist astro software – after all, stacking multiple exposures of the Milky Way and deep-sky objects is a basic tool of the trade there, isn’t it? True, but unfortunately they want to see lots of stars that they can perfectly align in identically exposed frames and, thanks to the large number, easily calculate a sub-pixel-precise shift. But we don’t have that. Right – bright stars/planets might be visible even at the lowest exposure, but how many or how few? The fact that, at a very, very high level, the stars aren’t the decisive factor – because they move across the sky a bit slower than our target, the Sun – is almost a given…
Autostakkert! It is one option for software used to stack images of the planetary system. Not because of the specific stacking method (“Lucky Imaging”), but because of the registration of many images using numerous alignment points (APs) in the reference image. These are found locally in the target image based on the closest brightness/contrast values, and an optimised overall shift is ultimately applied. This works brilliantly for the Moon with its clear structures, and also for the Sun with its sunspots. Unfortunately, however, in our eclipse images the Sun is obscured, the Moon is moving relative to the Sun, and the structures would only be visible in the very highly exposed images anyway.
Umbra – Simultaneous registration of moon and sun images from eclipse photographs. GUI available for Windows only, labelled ‘Demo Version’ and, at version 0.0.2, still quite ‘new’, but integration and HDR composition are in the works, at least in the command-line version. Could be promising…
Great – even more problems, or is there a solution this time? Sure – 1.5 of them 😉
One is that, if necessary, we’ll do it manually in Photoshop:
- Load the two darkest images as layers
- Select ‘Difference’ as the blending mode
- Zoom in and align the second-darkest image (2) as precisely as possible, pixel by pixel. The best way to do this is by using prominences or distinctive features of the corona that are visible in both images (using the arrow keys to move pixel by pixel with the ‘Move Tool’ selected)
- Save only image 2 (16-bit TIF)
- Repeat with the saved and aligned image 2 and image 3
- Repeat until you reach the brightest image
However, I would use the ‘workaround’ as a subsequent step: first open all the images as layers and select ‘Auto-Align’ under the “Edit” menu. There, simply select ‘Perspective’ and check/correct the result in the same way as outlined earlier.
Afterwards, stay in Photoshop for direct further processing, or save the layers again as separate files for further processing.
The ‘half-solution’ is the best, but far from trivial: phase correlation is used to register precisely to the corona structure. To do this, all individual images must be pre-processed – Fourier transform, cross-power spectrum and inverse FFT, with a subsequent fit, provide sub-pixel-accurate displacement data – see the basic workflow by Bray Falls below. The frequency-based method is robust against the enormous differences in image brightness and contrast – making it exactly the right choice here.
Creating HDR images from exposure brackets ⇧
- If you use Lightroom, simply see what happens when you select a bracketed series of images, right-click and choose ‘Merge Photos’ and ‘HDR…’, and give ‘Auto Align’ a go. The ‘Ghost Reduction’ feature is unlikely to be of much help with such minimal shifts.
The adjustment options are limited, and in my experience, satisfactory results are only achieved with the simplest subjects. - Photoshop offers significantly more here – various editing methods, predefined and custom templates for similar shooting situations, and numerous detailed settings to optimise the result.
- The next level consists of specialised HDR programmes such as Photomatix (Pro or Essential – for Mac and Windows). Analysis of source images, advanced alignment options (although the manufacturer itself states that these do not work during solar eclipses), noise reduction and chromatic aberration correction, white balance adjustable separately for each exposure level in the built-in RAW converter. In addition to automatic ghosting correction, selective ghosting correction is available with manual marking of ‘problem areas’. Numerous presets, even more detailed settings with live histogram and preview. Smooth blending of original images and, for anyone wishing to create unusual time-lapse sequences: batch function. This has been used to create quite impressive “close-ups” of solar eclipses with the corona.
Photoshop-Workflow from Sean Walker ⇧
For my german readers I translated Seans Workflow but here just read Eclipse Photography: Reveal Totality in HDR published in Sky and Telescope 2020 and Here is another older workflow from Russell Brown, former Senior Creative Director at Adobe.
Because if that’s not enough for you, you’ll have to start by dealing with the hundreds of calibration images (flats and darks) mentioned earlier, carry out the sub-pixel-accurate registration of the image sequences, stack multiple image sequences without fail, and grapple with multiscale Gaussian normalisation, Fourier Normalising Radial Graded Filters and/or Larson-Sekanina Filters and all that sort of thing. Sigh.
High-end processes ⇧
At least in PixInsight, there is a Solar Toolbox (though only for the visible Sun) and the Larson-Sekanina filter to assist with corona processing. This is also available in Siril – first published back in 1984, this radial gradient filter is very useful for highlighting structures around comets and, indeed, the Sun. What I haven’t found is a ready-made toolbox specifically for solar phenomena.
Reference images – Gold standard
When it comes to the gold standard, the name Miloslav Druckmüller keeps cropping up. A mathematics professor from and based in the Czech Republic, he specialises in numerical methods, digital image analysis and, in particular, the optimal processing of images of the corona. You can see what he’s capable of in the following, somewhat older piece, created from 25 individual exposures using flats and darks. Taken with a 105 mm APO at a focal length of 620 mm and a Baader filter using a Canon EOS 1Ds Mark III at ISO 100.

Unfortunately, the various software programmes – some of which were developed decades ago – are no longer available, whether as open-source, commercial or otherwise. Academic articles are available, but without a sound understanding of mathematics and signal processing, they’re not really much help. OK – the internet never forgets, after all, and archive.org does at least have a screenshot of the NAFE Image Analyzer for Windows XP 😉 A Paper on this in the AstrophysicalJournal is freely available. Is it of any use? I have no idea. In any case Phil Hart used it in part and on YT there’s a short video – however, it only works with mono images …
Quite a few leading figures in the field of eclipse photography have tried to emulate Druckmüller’s methods, contributed their own ideas, added their own code snippets, and have certainly been very successful – yet there simply doesn’t seem to be a foolproof, universally applicable guide of that standard, or indeed a ready-made script for whatever software you might be using. Achieving top results involves a lot of piecemeal work and is simply a great deal of effort.
For example, there are incredibly detailed shots by Nicolas Lefaudeux, but even less information about the workflow. The results from Phil Hart are also impressive and inspiring. But he was working with two EQ8 mountings, two EvoStar 150s, an Esprit 100 and 150, and a few other sets, and says it took 300 hours to process the images!
Bray Falls has revealed a little about his workflow on Astrobin, which Phil Hart says is quite similar to his own:
- Images: 15 identical exposure sequences, each comprising 13 frames with exposure times ranging from 1/1000 to 4 seconds, taken with an Askar 103 Triplet APO (700 mm f/6.8) on an AM5 (?) mount; plus 200 flat frames, 300 bias frames and 300 dark frames (!)
- Image alignment
Precisely aligned to the corona structure using phase correlation. To achieve this, all individual images must be pre-processed – Fourier transform, cross-power spectrum and inverse FFT, followed by a fit, provide sub-pixel-accurate displacement data. The frequency-based method is robust against the enormous differences in brightness between the images and against contrast differences - Linear HDR generation
Using proprietary algorithms, the ‘well-exposed’ areas (pixels) are determined from each exposure; the underlying structures are then matched with those from the other exposures to align their brightness, resulting in a uniform appearance.
The result is a linear image, familiar from astrophotography, with an enormous dynamic range, to the extent that, according to the author, even the 32-bit FITS format is insufficient. - Adaptive Kernel Convolution
A version of the image modified with a blur mask is subtracted from the image – except that the blur mask is not fixed, but changes locally in an optimal manner. This was developed by Druckmüller, and Bray has applied his own variant here. It acts like a standard Gaussian blur close to the Moon and, further out in the corona, as proposed by Fred Espinak.
That really brought home to me once again why I’d given up on studying physics – maths 😉 He explains it in more detail too – but it will cost you some bucks.
‘Multi-Gaussian Normalisation’ is a technique that generates several ‘blurred’ versions of an HDR image using a specific method and then optimises different areas of the image specifically through a normalised combination. The technique is included in and can be used within the open-source project Sunpy. In other words, it is the advanced version of the simple Photoshop method described above.
Want to practise editing?
It could well be that you’ll get great results with just 5 exposure levels, which would save you having to take loads of photos. But how do you go about creating different RAW exposure bracketing sequences if you’ve never photographed a solar eclipse before?
We’ve got you covered – and how: https://eclipsemegamovie.org/database 🙂
That’s it – for now ⇧
But that’s enough for now – before we get bogged down in more dry theory, we’ll be making our first recordings and mistakes in August 2026, and accommodation for 2027 has already been booked. Updates to follow 🙂